|
Quick Gallery
A simple way to make a web photo gallery |
Quick Gallery a small "drag and drop" utility / widget that rips thumbnails and images to size, then wires them together with standard HTML.
Quick Gallery was created as a replacement for Adobe Photoshop's "Web Photo Gallery" feature.
Seems like Adobe decided not to include it as the default in their newer version of Photoshop. Plus Adobe Bridge is retarded.
That being said, one of the disadvantages of Photoshop's web photo gallery is that creating or editing a template is rediculously difficult.
With Quick Gallery, you can create or modify templates using your existing HTML and CSS skills. Simply enter a !!DataTag!! in your HTML where you want that info to go.
|
It's FREE !
Release Notes
v1.0.25 (Apr. 12, 2011)
- Corrected issue with reading template variables within HTML tags.
- Added "id" to images.
- Corrected issue with some text fields not rendering.
|
Getting Started
1. Download and uncompress package.
When uncompressing the Quick Gallery ZIP package you should have a "QGallery.exe" program file and a "Templates" folder.
|
 QGallery.exe QGallery.exe
 Templates Templates
|
2. Launch Quick Gallery by double clicking on the QGallery.exe file.
NOTE: You can also drag and drop files or a folder onto the QGallery.exe icon, which will launch the application with the files or folder you dragged onto the icon. |
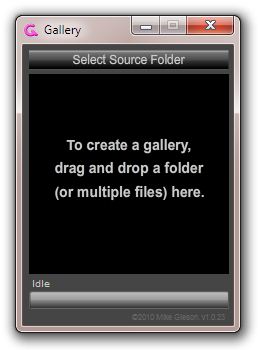 |
3. Drag and drop a folder (or multiple files) into the application..
The options section appears, providing you with various settings for your gallery.
See the Options section below for explaination of options.
|
 |
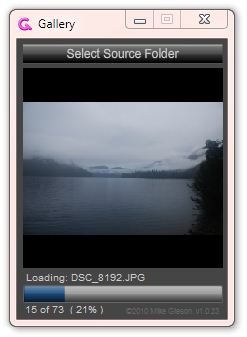
4. Process
Click the "OK" button to start processing. Thumbnails will appear within Quick Gallery and the progress bar will indicate the current status of processing.
When the processing is complete, the new gally folder will open and the gallery will automatically be launced in your browser.
|
 |
Options
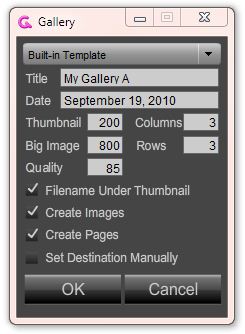
Template
|
The top drop-down menu displays available templates. |
Title
|
The title entered here will appear where ever a !!Title!! data tag appears within a template.
The default template displays this title in the top of the browser window and the upper left corner of a gallery page. |
| Date |
Appears where ever a !!Date!! data tag shows up in a template.
The default template includes the !!Date!! on the big image pages. |
| Thumbnail |
Maximum size (in pixels) for thumbnails. |
| Columns |
Number of columns to display in the thumbnail grid. |
| Rows |
Number of rows to display in the thumbnail grid. |
| Big Image |
The maximum size (in pixels) for the big image pages.. |
| Quality |
The output quality for JPG images.
NOTE: PNG images are not affected by the quality setting. |
| Filename Under Thumbnail |
Displays the "basename" of the file (aka without the extension) under each thumbnail image. |
| Create Images |
Uncheck this box if you don't want the images to be processed.
This option is useful as you work on your template. |
| Create Pages |
Uncheck to prevent pages from being created.
This option is useful if you want to re-rip the images and leave the pages alone. |
| Set Destination Manually |
Check this box to output the gallery to a different location.
By default, Quick Gallery automatically creates a new folder next to the selected folder.
For example: If you've selected the following folder to be processed:
C:/path/to/folder
... Then, by default, Quick Gallery will create a new folder as:
C:/path/to/folder gallery
When "Set Destination Manually" is checked, the gallery will be created in a folder of your choice. |
Templates
A "Templates" (case sensative) folder should be at the same location as the main program file ("QGallery.exe").
 QGallery.exe QGallery.exe
Templates
Within the main templates folder are sub-folders, which consist of 3 files:
1. big.html
2. thumbs.html
3. gallery.css
NOTE: The file names for these three files must be lower case, otherwise, the gallery will not render properly.
Quick Gallery automatically scans the "Templates" folder when it starts up. If it finds a sub-folder with these three files, then the sub-folder name will appear within Quick Gallery.
To create a new template:
Simply create a new folder put the three files listed above in there, then drop the newly created folder into the main templates folder .
Example:
QGallery.exe
Templates
My New Template
big.html
thumbs.html
gallery.css
The "big.html" file is for the big images. When a user clicks on a thumbnail image, it will link to the "big" HTML file to display the larger image.
The "thumbs.html" file is for the main thumbnail pages.
The "gallery.css" file is shared by both the big and thumb HTML pages.
Data Tags
Data tags are used within templates to inform Quick Gallery where certain kinds of data should appear. Simply put, data tags are replaced with the actual data when Quick Gallery rips a gallery.
!Next!!
|
The URL (file name) of the next page. You would use this inside an <a href> tag.
Code:
<a href="!!NavNext!!">NEXT</a>
|
!!Prev!!
|
The URL (file name) of the previous page. You would use this inside an <a href> tag.
Code:
<a href="!!NavPrev!!">PREVIOUS</a>
|
| !!PageNumbers!! |
A series of numbers with links to their respecive pages. Use this within your navigation so users can go directly to a page number.
Example: 1 2 3 4 5 6 7
Code:
<div>!!NavPageNumbers!!</div>
|
| !!ThumbPage!! |
A "big" page's associated "thumb" page. Allows the user to go back to the thumbnail view.
Example: <previous | thumbnail view | next >
Code:
<a href="!!NavThumbs!!">thumbnail view</a>
|
| !!CountCurrent!! |
The current thumbnail page or big page number.
Example: page 3 of 16
|
| !!CountTotal!! |
The total number of thumbnail pages or big pages.
Example page 3 of 16 |
| !!GalleryName!! |
The name of the gallery as defined in the Options. |
| !!DisplayCode!! |
The HTML code used to display the images. For the thumbnail pages, this code will be a table. For the big pages, this code will be a simple <a><img></a> line of code. |
| !!Filename!! |
For thumbnail pages, this refers the page (e.g. index3.html). For the big pages, this refers to the actual image file (e.g. DSC_2342.JPG). |
| !!Basename!! |
The same as !!Filename!! but without the extentsion. For example, if the filename is DSC_123.JPG, then the basename will be DSC_123 |
| !!Date!! |
The date as defined in the Options. |
Special CSS selectors
The thumbnail grid is output as an HTML table. We've attached class names to each of the elements within the table, so that you can use the gallery.css to control how the stuff is displayed. Here is an example of the table output by Quick Gallery, and the classnames that are used.
<table width="100%" height="100%" border="0" cellpadding="0" cellspacing="0" class="QuickGalleryThumbTable">
<tr>
<td class="QuickGalleryImageCell">
<a href="pages/DSC_8143.html"><img src="thumbnails/DSC_8143.JPG" class="QuickGalleryThumbImage" border="0" alt="DSC_8143.JPG"><br /><div class="QuickGalleryThumbTitle">DSC_8143</div>
</a>
</td>
<td class="QuickGalleryImageCell">
<a href="pages/DSC_8144.html"><img src="thumbnails/DSC_8144.JPG" class="QuickGalleryThumbImage" border="0" alt="DSC_8144.JPG"><br /><div class="QuickGalleryThumbTitle">DSC_8144</div></a>
</td>
<td class="QuickGalleryImageCell">
<a href="pages/DSC_8145.html"><img src="thumbnails/DSC_8145.JPG" class="QuickGalleryThumbImage" border="0" alt="DSC_8145.JPG"><br /><div class="QuickGalleryThumbTitle">DSC_8145</div></a>
</td>
</tr>
</table>
The big pages also use HTML code that have classnames included in the code. Here is an example of the code Quick Gallery outputs for the big image:
<a href="DSC_8138.html">
<img src="../images/DSC_8137.JPG" class="QuickGalleryBigImage" border="0" alt="DSC_8137.JPG"></a>
Image IDs
Thumbnail and "big" images will also have the id's assigned to them.
Thumbnails
<img src="../images/DSC_8137.JPG" class="QuickGalleryBigImage" border="0" alt="DSC_8137.JPG" id="thumb0"></a>
Where "N" is a number from 0 to the total number of thumbnails on the page. ("0" is the first thumbnail).
Big images
<img src="../images/DSC_8137.JPG" class="QuickGalleryBigImage" border="0" alt="DSC_8137.JPG" id="bigImage"></a>
Since there is only one image on the "big" pages, the id will always be "bigImage" on the big pages.
JavaScript Data
Quick Gallery also outputs a javascript file, which contains two arrays, which super-nerds can use to furthur leverage their template with all kinds of stuff.
The first array "QG_thumbs" provides a JSON data (an object) for each thumbnail page. The second array "QG_bigs" provides information about each file.
Here's an example of how you can retrive information out of the array's:
// Get's the HTML filename for the third "big" image:
var MyData = QG_bigs[3].page;
alert(MyData);
// Shows all the data in the first image:
var MyImageData =
QG_bigs[0];
var see = "";
for(var prop in MyImageData){
see += prop + " : " + MyImageData[prop];
}
alert(see);
|